Installation and Administration Guide
Introduction
This Installation and Administration Guide covers WStore versions since 0.3 (0.3.0, 0.3.1, 0.4 and 0.5) corresponding to FIWARE releases 3.3.1, 3.3.2, 4.1.1 and 4.4.3). Any feedback on this document is highly welcomed, including bugs, typos or things you think should be included but aren’t. Please send it to the “Contact Person” email that appears in the Catalogue page for this GEi.
Installation
Requirements
In order to have WStore up and running the following software is required. This section describes all the requirements of a basic WStore installation. However, these dependencies are not meant to be installed manually in this step, as they will be installed throughout the documentation
- A Web Server (i.e Apache)
- MongoDB
- Python 2.7. Python 3 and other versions are not supported.
- Django nonrel 1.3 or 1.4
- djangotoolbox
- django_mongodb_engine
- lxml
- rdflib 3.2.0+
- rdflib-jsonld
- Pymongo
- Whoosh
- paypalpy
- django-crontab
- django-social-auth
- wkhtmltopdf
Installing basic dependencies
The Web Server, MongoDB, wkhtmltopdf, python and pip itself can be installed using the package management tools provided by your operating system or using the available installers.
These packages are available for Linux and Mac OS so WStore should work in those systems. However, the current version of WStore and its installer / installation guide have been tested under Ubuntu 12.04, Ubuntu 13.10, Ubuntu 14.04, CentOS 6.3, CentOS 6.5 and CentOS 7. THESE ARE THEREFORE CONSIDERED AS THE SUPPORTED OPERATING SYSTEMS.
Note
WStore needs Python 2.7 to work; however, CentOS 6 uses Python 2.6 in the system. Although it is possible to install WStore in CentOS 6 (as explained before), it is strongly recommended to use an Ubuntu/Debian distribution.
Installing basic dependecies using the script
In order to facilitate the installation of the basic dependencies the script resolve-basic-dep.sh has been provided. This script will install the needed packages for both Ubuntu/Debian and CentOS systems. For CentOS 6 systems, this script will install Python 2.7 and its tools, without replacing the system Python, making them avalailable as python2.7, pip2.7 and vitualenv2.7.
Note
The script resolve-basic-dep.sh may replace some of your system packages, so if you have software with common dependencies you may want to manually resolve WStore basic dependencies.
To execute the script run the following command
$ sudo ./resolve-basic-dep.sh
Manually resolving basic dependencies
Following, you can find how to resolve WStore basic dependencies if you do not want to use the script. Be aware that some commands require to be executed as root.
Debian/Ubuntu
To install Python and pip
# apt-get install python python-pip
To install MongoDB
# apt-get install mongodb
To install wkhtmltopdf
# apt-get install wkhtmltopdf
CentOS/RedHat
As mentioned above, CentOS 6 systems include Python 2.6. Replacing this Python version with Python 2.7 may break the system, so it should be installed separately.
To install Python 2.7, you need to resolve some development dependencies
# yum groupinstall "Development tools"
# yum install zlib-devel
# yum install bzip2-devel
# yum install openssl-devel
# yum install ncurses-devel
The next step is to download and compile Python 2.7
# cd /opt
# wget --no-check-certificate https://www.python.org/ftp/python/2.7.6/Python-2.7.6.tar.xz
# tar xf Python-2.7.6.tar.xz
# cd Python-2.7.6
# ./configure --prefix=/usr/local --enable-shared
# make && make altinstall
Then, include the line /usr/local/lib at the end of the file /etc/ld.so.conf, In a CentOS 6.5 it shoud be similar to:
include ld.so.conf.d/*.conf
/usr/local/lib
To finish with Python 2.7 installation execute the following command:
# /sbin/ldconfig
Finally, install Python 2.7 setup tools
# cd /opt
# wget https://bitbucket.org/pypa/setuptools/raw/bootstrap/ez_setup.py
# /usr/local/bin/python2.7 ez_setup.py
# /usr/local/bin/easy_install-2.7 pip

# ln -s /usr/local/bin/python2.7 /usr/bin/python2.7
# ln -s /usr/local/bin/pip2.7 /usr/bin/pip2.7
Now, Python 2.7 and its pip are available as python2.7 and pip2.7
In CentOS 7, python 2.7 is included with the system. To install pip execute the following commands:
# rpm -iUvh http://dl.fedoraproject.org/pub/epel/7/x86_64/e/epel-release-7-5.noarch.rpm
# yum -y update
# yum install -y python-pip
MongoDB is included in the official MongoDB downloads repositories. Once the related repositories has been included (see http://docs.mongodb.org/manual/tutorial/install-mongodb-on-red-hat-centos-or-fedora-linux/ ) install MongoDB with the command
# yum install -y mongodb-org
To install wkhtmltopdf get the related rpm for your system from http://wkhtmltopdf.org/downloads.html and install the package. For example, version 0.12.1 for a 64 bits architecture:
# wget http://download.gna.org/wkhtmltopdf/0.12/0.12.1/wkhtmltox-0.12.1_linux-centos6-amd64.rpm
# rpm -ivh wkhtmltox-0.12.1_linux-centos6-amd64.rpm
Resolving extra dependencies
Once basic dependencies have been resolved, it is possible to install python and Django dependencies using the provided scripts (As explained in the next section). However, before launching the installation script you should be aware of some aspects:
Note
If you have used the script resolve-basic-dep.sh to resolve the basic dependencies you do not need to install the following packages, since they are already installed.
The script used to resolve python dependencies will create a virtual environment for the project with the corresponding packages, so to use this script you need virtualenv2.7 and python 2.7.
# Ubuntu/Debian, CentOS 7
$ pip install virtualenv

#CentOS 6 (Suposing you have installed Python 2.7 following the previous instructions)
$ pip2.7 install virtualenv
WStore uses wkhtmltopdf for creating invoices. This software requires an X Server to work. If you do not have one, WStore will try to run Xvfb on the display :98. To install Xvfb use the following command.
# Ubuntu/Debian
$ apt-get install xvfb

#CentOS/RedHat
$ yum install xorg-x11-server-Xvfb
It is possible that the setup.sh script fails while installing lxml. See http://lxml.de/installation.html#installation if in trouble installing lxml. You probably have to install the following packages.
# Ubuntu/Debian
$ apt-get install libxml2-dev libxslt1-dev zlib1g-dev python-dev

#CentOS/RedHat
$ yum install libxml2-devel libxslt-devel zlib-devel python-devel
Installing WStore
Installing WStore using scripts
To install WStore the script setup.sh has been provided. This script resolve all needed python and django dependencies (This script does not install the basic dependencies such as MongoDB, python, etc), and execute a complete test in order to ensure that WStore is correctly installed.
Be aware os having MongoDB up and running before executing the script. If MongoDB fails when starting you may need to configure the smallfiles option (see http://docs.mongodb.org/manual/reference/configuration-options/).
# Ubuntu/Debian
$ service mongodb start

# CentOS/RedHat
$ service mongod start
You can execute the script setup.sh to perform the complete installation. Please note that this script should be run as an user without using sudo (no root permissions are needed, although root user is allowed). Executing the script using sudo will cause Python and Django packages to be installed in the system, not in the virtualenv, which can cause WStore not working properly or even break your system if using CentOS.
$ ./setup.sh
The setup.sh script will also offers you a wizard to ease the configuration process. This wizard will generate the settings.py file for you, so if you follow the wizard, you can avoid following the Configuration section (unless you want to introduce some specific configuration). However, it is highly recommended to read the Configuration section for a better understanding of the parameters. To use this wizard, just type ‘y’ when asked:
Do you want to create an initial configuration? [y/n]:
y
First, you will be required a database name. You can introduce the name that you want:
Include a database name:
wstore_db
Then, you should include a site name. This value is up to you:
Include a site name:
store
After that, the script will ask you the domain where the Store is to going run. You must introduce a valid domain because otherwise the Store won’t run.
Include a site domain:
http://host:port
Later, you will be required to introduce the name of your store instance. You are free to introduce any name that you want. This will be the name used to register your WStore instance in external components such as the Marketplace:
Include a name for your instance:
FIWARE
Then, the script will ask you for a basic e-mail configuration. If you don’t want to provide a mail configuration, just type ‘n’ when asked.
Do you want to include email configuration? [y/n]:
<y/n>
If you choose to include the mail configuration, you will be asked for a SMTP server, a mail address, a mail user, and the password associated to that user. This mail configuration will be used as the source address for notifications sent by email. You will be also asked for a requests mail that will be used as the destination mail for user requests asking for the provider role:
Include email smtp server endpoint:
{YOUR_SMPT_SERVER}
Include WStore email:
{YOUR_EMAIL_ADDRESS}
Include WStore email user:
{USER_NAME}
Include WStore email password:
{PASSWORD}
Include WStore provider requests email:
{REQUEST_MAIL}
Finally, you must choose the authentication method. You have two possible options: use (1) an identity manager or (2) the Django Authentication System.
Select authentication method:
1) Identity manager
2) WStore
If you choose the identity manager option, you will be asked for the identity manager endpoint, and the basic OAuth2 configuration (Client ID and Client Secret). You can avoid to introduce the basic OAuth2 configuration if you don’t have the credentials at that moment. However, in order to start the Store, you need to introduce this information in the settings.py file as explained in the Configuration section. Note that for using this authentication method you must have registered your WStore instance in the identity Manager using the Callback URL explained in the configuration section of this document.
Include Identity manager endpoint:
{IDM_END_POINT}
Do you want to include OAuth2 configuration? [y/n]:
y
Include Client id:
{CLIENT_ID}
Include client secret:
{CLIENT_SECRET}
If you are installing WStore version 0.5 (FIWARE 4.4.3), it includes support for KeyRock new version, so this step requires more information. First you will be asked to provide the identity manager endpoint. In this case, you can leave the default one (The one in the FIWARE Lab). If you choose a different identity manager, you will need to provide the API version and the endpoint of the KeyStone instance of the concrete cloud environment
Include Identity manager endpoint: (default https://account.lab.fiware.org/)
{IDM_END_POINT}
Include KeyRock API version [1/2]:
{API_VERSION}
Include KeyStone endpoint:
{KEYSTONE_ENDPOINT}
In you choose the Django Authentication System and you don’t have a superuser in the selected database, you will be asked to create a new superuser in order to be able to manage the Store.
Would you like to create one now? (yes/no): yes
Username (leave blank to use 'basic'): {USERNAME}
E-mail address: {MAIL_ADDR}
Password: {PASS}
Password (again): {PASS}
If you don’t want the wizard to start when the script is executed, you must run the script as follow:
$ ./setup.sh --noinput
Manually resolving python dependencies
In case you do not want to use the script setup.sh, Python and Django dependencies can be easily installed pip. Note that if you do not use the provided script, you will need to configure WStore manually as explained in the following section.
It is sugested to create a virtualenv where install Python and Django dependencies.
$ virtualenv-2.7 src/virtenv
or, if virtualenv-2.7 is not available
$ virtualenv src/virtenv
Then it is needed to activate the virtual env
$ source src/virtenv/bin/activate
To install rdflib, lxml, pymongo, Whoosh, Stemming, requests, and regex
$ pip install "lxml==3.4.4" "rdflib==4.2.0" "pymongo==2.8" "Whoosh==2.7.0" "Stemming==1.0.1" requests regex
Note
See http://lxml.de/installation.html#installation if in trouble installing lxml. You probably have to install the following packages:
# Ubuntu/Debian
$ apt-get install libxml2-dev libxslt1-dev zlib1g-dev python-dev

#CentOS/RedHat
$ yum install libxml2-devel libxslt-devel zlib-devel python-devel
WStore requires the Django nonrel framework ready to work with MongoDB. To install this framework in its version 1.4 as well as djangotoolbox and django_mongodb_engine for this version use the following commands:
$ pip install https://github.com/django-nonrel/django/archive/nonrel-1.4.zip
$ pip install https://github.com/django-nonrel/djangotoolbox/archive/toolbox-1.4.zip
$ pip install https://github.com/django-nonrel/mongodb-engine/archive/mongodb-engine-1.4-beta.zip
To install the rdflib plugin for json-ld format use the following command:
$ pip install https://github.com/RDFLib/rdflib-jsonld/archive/master.zip
To install the PayPal module paypalpy use the following command:
$ pip install https://github.com/conwetlab/paypalpy/archive/master.zip
WStore uses some plugins for django, to install them use the following commands:
$ pip install "nose==1.3.6" "django-nose==1.4"
$ pip install "django-social-auth==0.7.28"
$ pip install "django-crontab==0.6.0"
Configuration
Note that if the script has been used to resolve WStore python dependencies, they have been installed in a virtual environment that must be activated before running any configuration command (python manage.py {command}). To activate the virtualenv execute the following command from the installation directory.
$ source src/virtenv/bin/activate
Moreover, if you have followed the configuration wizard of the setup.sh script you can skip this section. However, it is highly recomended to read it in order to understand the different configuration settings.
Database Configuration
The preliminary configuration of the database connection is included in settings.py and is ready to work using MongoDB in the default host and port, with a database called wstore_db, and without security. To modify the database connection configuration edit the DATABASES setting:
DATABASES = {
    'default': {
        'ENGINE': 'django_mongodb_engine',
        'NAME': 'wstore_db',
        'USER': '',
        'PASSWORD': '',
        'HOST': '',
        'PORT': '',
        'TEST_NAME': 'test_database',
    }
}
Using this setting is possible to change the database name and the test database name, include an user and password, and specify the host and port of MongoDB.
Note
The engine field cannot be changed, since WStore only works with MongoDB.
The name of the instance is included in the STORE_NAME setting:
STORE_NAME = 'WStore'
Creating the deafult site
WStore (and any software using django_mongodb_engine and django sites framework) requires the creation of a default ‘’Site’’ model. To create the default site execute the following command including a site name and the site domain where your instance is going to run:
$ python manage.py createsite site_name http://host:port
Get the default site id:
$ python manage.py tellsiteid
Include the site id in ‘’settings.py’’ updating the ‘’SITE_ID’’ setting
SITE_ID = u'515ab0738e05ac20b622888b'
PayPal Credentials Configuration
WStore can use PayPal to perform chargings. To activate this fuctionality change PAYMENT_METHOD setting:
PAYMENT_METHOD = 'paypal'
In order to receive the payments, it is necessary to include the credentials of a Business PayPal account in the src/wstore/charging_engine/payment_client/paypal_client.py file. In this file is also possible to configure the endpoints used by PayPal, this settings contain by default the testing sandbox endpoints.
# Paypal creadetials
PAYPAL_USER = '<PayPal_user_name>'
PAYPAL_PASSWD = '<PayPal_password>'
PAYPAL_SIGNATURE = '<PayPal_signature>'
PAYPAL_URL = 'https://api-3t.sandbox.paypal.com/nvp'
PAYPAL_CHECKOUT_URL='https://www.sandbox.paypal.com/webscr?cmd=_express-checkout'
Pay-Per-Use Cron Configuration
WStore uses a Cron task to perform the aggregation and charging of Pay-per-use information. The periodicity of this task can be configured using the CRONJOBS setting of settings.py using the standard Cron format.
CRONJOBS = [
    ('0 5 * * *', 'django.core.management.call_command', ['resolve_use_charging']),
]
Once the Cron task has been configured, it is necessary to include it in the Cron tasks using the command:
$ python manage.py crontab add
It is also possible to show current jobs or remove jobs using the commands:
$ python manage.py crontab show

$ python manage.py crontab remove
Email configuration
WStore uses some email configuration for sending notifications. To configure the source email used by WStore for sending notifications include the following settings:
WSTOREMAILUSER = 'email_user'
WSTOREMAIL = 'wstore_email'
WSTOREMAILPASS = 'wstore_email_passwd'
SMTPSERVER = 'email_smtp_server'
It is also possible to configure a provider notification email. This email will be used by WStore as the destination email when an user requests the provider role. To set this email, include it in the WSTOREPROVIDERREQUEST setting:
WSTOREPROVIDERREQUEST = 'provider_requ_email'
Authentication method Configuration
WStore allows two different methods for the authentication of users. The method for users management should be selected in the initial configurantion of the WStore instance. Note that WStore does not store exactly the same info for the two methods, so, changing between authentication methods when the system has started to be used may cause unexpected behaviours.
FI-WARE Identity management
It is possible to delegate the authentication of users to the FI-WARE Identity Management system on a FI-WARE instance. View FI-LAB info in:
To do that, the first step is setting up the OILAUTH setting to True (Note that this is the default value).
OILAUTH=True
Then configure the authentication endpoint in filling the setting:
FIWARE_IDM_ENDPOINT='https://fiware_endpoint'
Next, register WStore as an application in the identity management portal, to do that WStore uses the following URL as as callback URL for OAuth2 authentication:
<host_wstore>/complete/fiware/
Once you have registered your WStore instance, get OAuth2 credentials needed for the authenticacion of your application. You will need to create some roles in your application, one for offering provider, other for offering customer, and a role for developers. This roles will be used in the organizations with access to your WStore instance in order to grant organization users the corresponding rights for purchasing and creating offerings for a complete organization. To include the name you have specified for that roles, you have to fill the following settings in social_auth_backend.py:
FIWARE_PROVIDER_ROLE='Name of the role'
FIWARE_CUSTOMER_ROLE='Name of the role'
FIWARE_DEVELOPER_ROLE='Name of the role'
Finally, include OAuth2 credentials in your WStore instance by filling the settings:
FIWARE_APP_ID = client_id_number
FIWARE_API_SECRET = client_secret
If you are using WStore version 0.5 (FIWARE 4.4.3), you will need to include some aditional fields. First, it is needed to include the Idm API version. If the API has version 2, it is also required to include the KeyStone endpoint :
FIWARE_IDM_API_VERSION = 2
FIWARE_KEYSTONE_ENDPOINT = '{ KEYSTONE_ENDPOINT }'
WStore Identity Management
WStore has its own authentication mechanism based on django auth. To enable WStore authentication, set up the OILAUTH setting to False:
OILAUTH=False
For API accesses, WStore has an OAuth2 server that can be enabled by including the oauth2provider in the INSTALLED_APPS setting.
Applications can be registered in WStore using the django admin view.
Database Population
Before running WStore, it is necessary to populate the database. This can be achieved by using this command:
$ python manage.py syncdb
This command creates indexes for the different models of the database and ask if you want to create a Django superuser. In case you are using WStore authentication, this superuser is required in order to perform administrative tasks. If you are using FI-WARE authentication, users are taken from the identity management system, so do not create the user. Users with corresponding role (Provider) will be able to perform the administrative tasks.
An example of the output of this command follows:
...

You just installed Django's auth system, which means you don't have any superusers defined.
Would you like to create one now? (yes/no): yes
Username (leave blank to use 'francisco'): admin
E-mail address: admin@email.com
Password: ***** (admin)
Password (again): ***** (admin)
Superuser created successfully.

...
Final Steps
Make sure that the directories wstore_path/src/media, wstore_path/src/media/resources, wstore_path/src/media/bills, wstore_path/src/wstore/search/indexes exist, and that the server has sufficient permissions to write on them. For example, the following commands give permissions to apache user in a Debian/Ubuntu system:
# chgrp -R www-data  <wstore_path>/src/media <wstore_path>/src/wstore/search/indexes <wstore_path>/src/wstore/social/indexes

# chmod g+wrX -R <wstore_path>/src/media <wstore_path>/src/wstore/search/indexes <wstore_path>/src/wstore/social/indexes
Note
In a CentOS system the commands are similar but using apache instead of www-data as group.
it is possible to collect all static files in WStore in a single directory using the following command and answering yes when asked. Be aware of activating the virtualenv if needed as explained in the previous sections.
$ python manage.py collectstatic
Running WStore
Running WStore using the Django internal web server
Be aware that this way of running WStore should be used for evaluation purposes. Do not use it in a production environment.
Note
Since the installation scripts create a virtualenv to install the dependencies, you must activate virtualenv before running the runserver command if you have installed and configured the Store using these scripts. To do so, you must run the following command (in the src folder):
$ source virtenv/bin/activate
To start WStore, type the following command:
$ python manage.py runserver 0.0.0.0:8000
Then, go to http://computer_name_or_IP_address:8000/ where computer_name_or_IP_address is the name or IP address of the computer on which WStore is installed.
Integrating WStore with Apache
If you choose to deploy WStore in Apache, the libapache2-mod-wsgi module must be installed (and so does Apache!). To do so, type the following command in Ubuntu/Debian:
# apt-get install apache2 libapache2-mod-wsgi
In CentOS 6 systems apache can be installed as
# yum install -y httpd
In the case of mod_wsgi in CentOS 6, it is not possible to directly use the existing package. As explained in previous sections CentOS 6 relies in Python 2.6 to work, while WStore uses Python 2.7. For this reason when mod_wsgi is installed using yum, it uses Python 2.6, causing WStore not working properly over Apache.
To install mod_wsgi using python 2.7 (It suposes that you have installed Python 2.7 as explained in the Installing basic dependencies section) use the following commands (For version 4.3.0 of mod_wsgi):
# yum install -y httpd-devel
# wget https://github.com/GrahamDumpleton/mod_wsgi/archive/4.3.0.zip
# unzip 4.3.0.zip
# cd mod_wsgi-4.3.0/
# ./configure --with-python=/usr/local/bin/python2.7
# make install
# chmod 755 /usr/lib64/httpd/modules/mod_wsgi.so
Finally, turn on mod_wsgi in apache by creating the file /etc/httpd/conf.d/wsgi.conf and including:
LoadModule wsgi_module modules/mod_wsgi.so
Then you have to populate the wsgi.py file:
import os
import sys
path = 'path_to_wstore/src'
if path not in sys.path:
    sys.path.insert(0, path)
os.environ['DJANGO_SETTINGS_MODULE'] = 'settings'
import django.core.handlers.wsgi
application = django.core.handlers.wsgi.WSGIHandler()
If you are running WStore using a virtualenv environment (for example if you have installed the dependencies using the provided script) your wsgi.py file sholud have the following structure:
import os
import sys
import site

site.addsitedir('vitualenv_path/local/lib/python2.7/site-packages')
path = 'path_to_wstore/src'
if path not in sys.path:
    sys.path.insert(0, path)

os.environ['DJANGO_SETTINGS_MODULE'] = 'settings'

# Activate your virtual env
activate_env=os.path.expanduser("vitualenv_path/bin/activate_this.py")
execfile(activate_env, dict(__file__=activate_env))

import django.core.handlers.wsgi
application = django.core.handlers.wsgi.WSGIHandler()
Please, pay attention that you set the right path to the wtore/src directory.
The next step consist on creating the virtualhost for WStore. To do that, it is possible to modify the default site configuration file (located in /etc/apache2/sites-available/ in an Ubuntu/Debian system or in /etc/httpd/sites-available in a CentOS/RedHat system) or create a new site configuration file (i.e wstore.conf).
In a CentOS system you may need to create the sites-enabled and sites-available directories and include them in the apache configuration. To do that follow the next steps:
# cd /etc/httpd/
# mkdir sites-available
# mkdir sites-enabled
Then edit /etc/httpd/conf/httpd.conf file and include the following lines at the end of the file
NameVirtualHost *:80
Include /etc/httpd/sites-enabled/
Once you have the site enabled, restart Apache
# Ubuntu/Debian
# service apache2 restart

# CentOS/RedHat
# service httpd restart
To configure WStore virtualhost add the following lines to the site configuration file:
<VirtualHost *:80>
        ...
        ### WStore ###
        WSGIScriptAlias / <path_to_django_wsgi>
        WSGIPassAuthorization On
        Alias /static <path_to_wstore>/src/static
        <Location "/static">
                SetHandler None
                <IfModule mod_expires.c>
                        ExpiresActive On
                        ExpiresDefault "access plus 1 week"
                </IfModule>
                <IfModule mod_headers.c>
                        Header append Cache-Control "public"
                </IfModule>
        </Location>
        <Location "/static/cache">
                <IfModule mod_expires.c>
                        ExpiresDefault "access plus 3 years"
                </IfModule>
        </Location>
        ...
</VirtualHost>
Again, pay special attention to the paths to the django wsgi file and the path_to_wstore/src/static directory.
Moreover, it is important that the apache user (www-data in Ubuntu/Debian, apache in CentOS/RedHat) could access the directory where WStore is deployed. Be aware of configuring the directory permissions so this user can access wstore directory and go through the previous directories in the path (x permission).
Finally, depending on the version of apache you are using, you may need to explicitly allow the access to the directory where WStore is deployed in the configuration of the virtualhost. To do that, add the following lines to your virtualhost:
Apache version < 2.4
<Directory /path/to/wstore/src>
    Order deny,allow
    Allow from all
</Directory>
Apache version 2.4+
<Directory /path/to/wstore/src>
    Require all granted
</Directory>
Sanity check Procedures
The Sanity Check Procedures are the steps that a System Administrator will take to verify that an installation is ready to be tested. This is therefore a preliminary set of tests to ensure that obvious or basic malfunctioning is fixed before proceeding to unit tests, integration tests and user validation.
End to End Testing
Please note that the following information is required before performing this process.
- The computer name or the IP address where WStore is running.
- Valid credentials for WStore (i.e credentials created during the syncdb command or an Identity Manager user).
- A logo image.
To check if WStore is running follow these steps:
- Open a browser and enter WStore.
- The login window should appear (WStore or idM depending on the configuration).
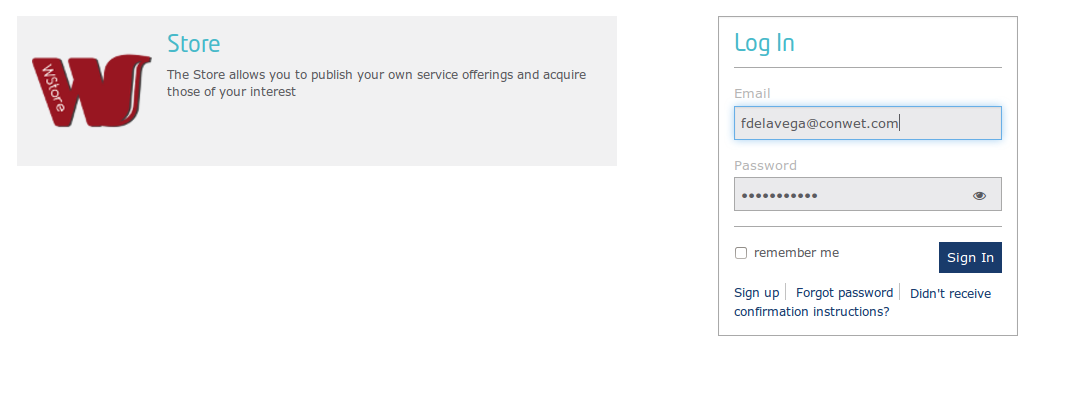
- Introduce your credentials and click login
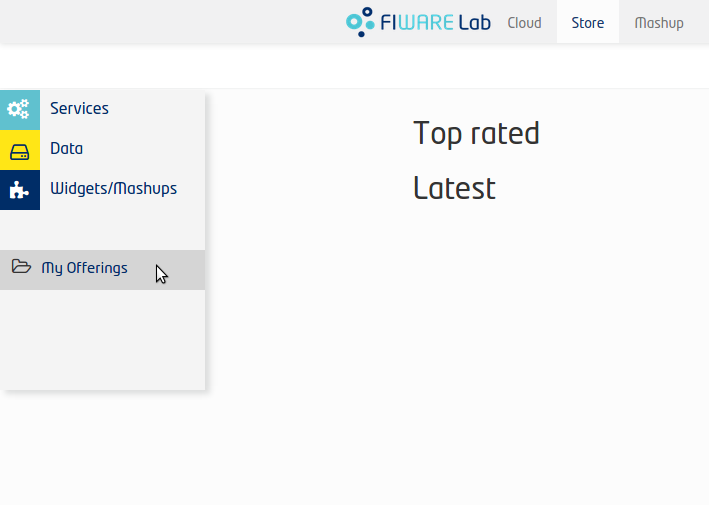
- Go to My Offerings
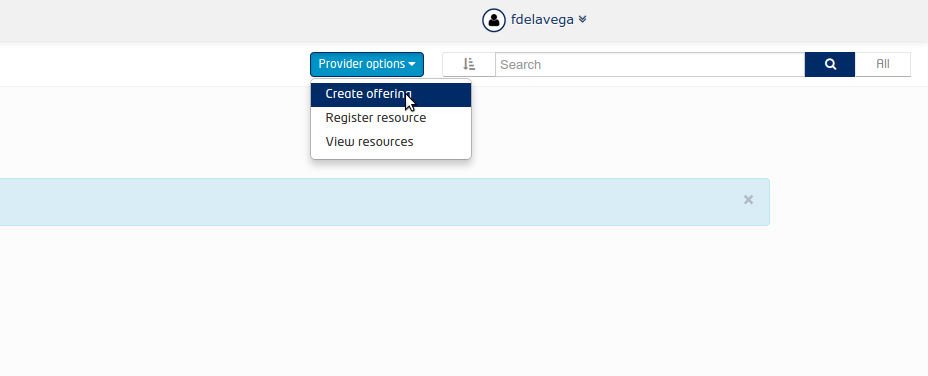
- Select the Provider Options dropdown and choose Create offering
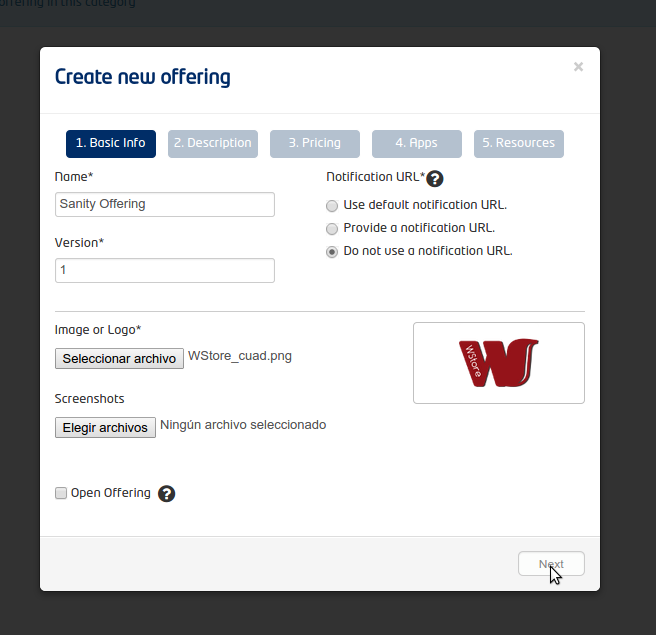
- Fill the name, and the version
- Include the logo and the screenshots
- Select the option for not providing a notification URL
- Press Next
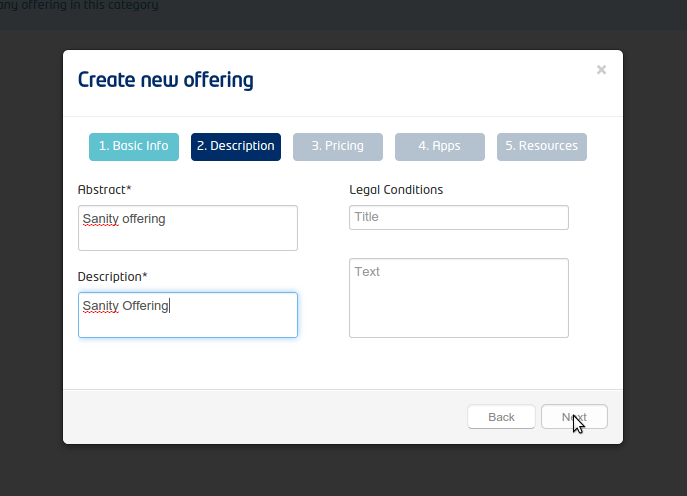
- Fill description Info and press Next
- Click Next in the pricing form.
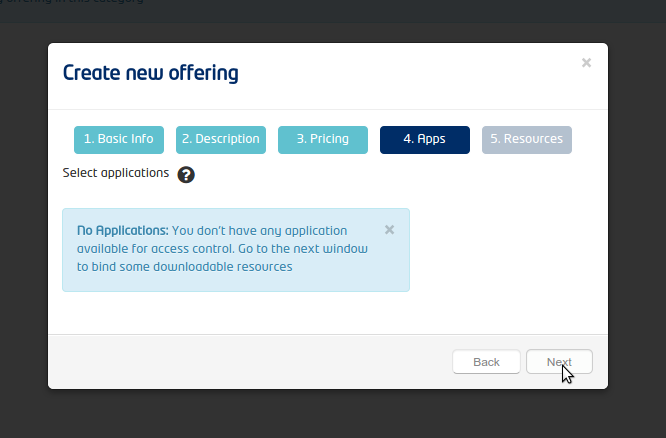
- Click Next in the Application selection form (This form only appears if using idM for authentication).
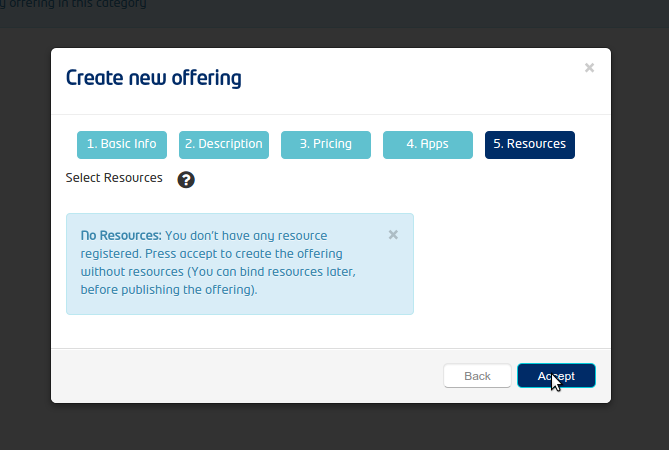
- Press Accept
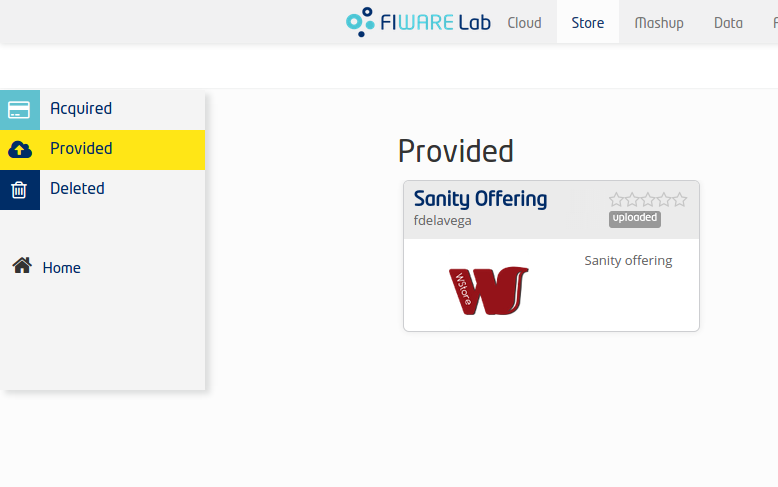
- The created offering should appear in the Provided section
List of Running Processes
We need to check that the Apache web server and the MongoDB database are running. WStore uses a python interpreter, but it will not be listed as it runs embedded into apache2. If we execute the following command:
ps -ewF | grep 'apache2\|mongodb' | grep -v grep
It should show something similar to the following:
$ ps -ewF | grep 'apache2\|mongodb' | grep -v grep
root      1154     1  0 22744  3584   1 11:07 ?        00:00:00 /usr/sbin/apache2 -k start
www-data  1157  1154  0 22677  2620   2 11:07 ?        00:00:00 /usr/sbin/apache2 -k start
www-data  1178  1154  0 111374 6672   0 11:07 ?        00:00:00 /usr/sbin/apache2 -k start
www-data  1179  1154  0 111374 6672   2 11:07 ?        00:00:00 /usr/sbin/apache2 -k start
mongodb   4879     1  0 176281 16016  2 12:28 ?        00:00:01 /usr/bin/mongod --config /etc/mongodb.conf
Network interfaces Up & Open
To check the ports in use and listening, execute the command:
$ sudo netstat -ltp
The expected results must be something similar to the following:
Active Internet connections (only servers)
Proto Recv-Q Send-Q Local Address           Foreign Address         State       PID/Program name
tcp        0      0 localhost:27017         *:*                     LISTEN      4879/mongod
tcp        0      0 localhost:28017         *:*                     LISTEN      4879/mongod
tcp6       0      0 [::]:http               [::]:*                  LISTEN      1154/apache2
Databases
The last step in the sanity check, once that we have identified the processes and ports, is to check the MongoDB database that have to be up and accepting queries. If we execute the following command:
$ mongo wstore_db -u wstore -p wstore
It should show a message text similar to the following:
MongoDB shell version: 2.0.4
connecting to: wstore_db
>
Diagnosis Procedures
The Diagnosis Procedures are the first steps that a System Administrator will take to locate the source of an error in a GE. Once the nature of the error is identified with these tests, the system admin will very often have to resort to more concrete and specific testing to pinpoint the exact point of error and a possible solution. Such specific testing is out of the scope of this section.
Resource availability
Memory use depends on the number of concurrent users as well as the free memory available and the hard disk. WStore requires a minimum of 512 MB of available RAM memory, but 1024 MB of free memory are recomended. Moreover, WStore requires at least 10 GB of hard disk space.
Remote Service Access
N/A
Resource consumption
Resource consumption strongly depends on the load, especially on the number of concurrent users logged in.
- The main memory consumption of the Apache Web server should be between 64 MB and 1024 MB.
- MongoDB main memory consumption should be between 30 MB and 500 MB.
I/O flows
The only expected I/O flow is of type HTTP, on port defined in Apache Web Server configuration files.